CONVERT PRE-APPROVED LEADS TO FUNDED LOANS USING A MULTICHANNEL CAMPAIGN WITH PRE-APPROVED OFFERS FOR QUALIFIED APPLICANTS
Preview the Workflow
Author:
Categories:
Tools:
Publication date:
Plan:
Description:
Today’s consumers have more control over their financial decisions. They have more access, choices, and information to decide which offers are right for them. Financial institutions that use proactive, data-driven marketing strategies designed to engage prospects and customers across multiple channels perpetually are steps ahead in the purchasing process.
Sending personalized offers will help the financial institutions to:
- Increase loan volume
- Lower cost per loan
- Target more qualified applicants using credit and underwriting criteria
- Convert pre-approved leads to funded loans
- Raise awareness and perception
This automated workflow is designed for sending pre-approved offers for mortgages, home equity, auto, credit card, and consumer loans when they are most ready to buy.
We will illustrate the multichannel campaign on the example of a Personal Loan Pre-Approval offered to qualified consumers.
Implementation
1. Select your audience based on the following:
- your underwriting criteria,
- customer’s high propensity to respond,
- demographic score
- credit behavior usage, etc.
Create a string variable {{loanQualified}} to update the contact list of qualified customers via API automatically.
2. Create a string variable {{activeLoan}}, which will show the loan status: whether the customer applied for the loan or whether they have a current active loan.
3. Create a segment “Qualified for Loan” using the abovementioned variables. You can split your contacts into multiple parts based on the amount of the loan or other underwriting criteria to be able to send different campaigns/offers using the same dynamic templates.
Note: You can choose whether you want your contact to reenter the workflow or if you want this to be a one-time campaign. In case of building dynamic templates, you can use the same workflow for multiple Loan types. Thus, the contact may reenter the workflow.
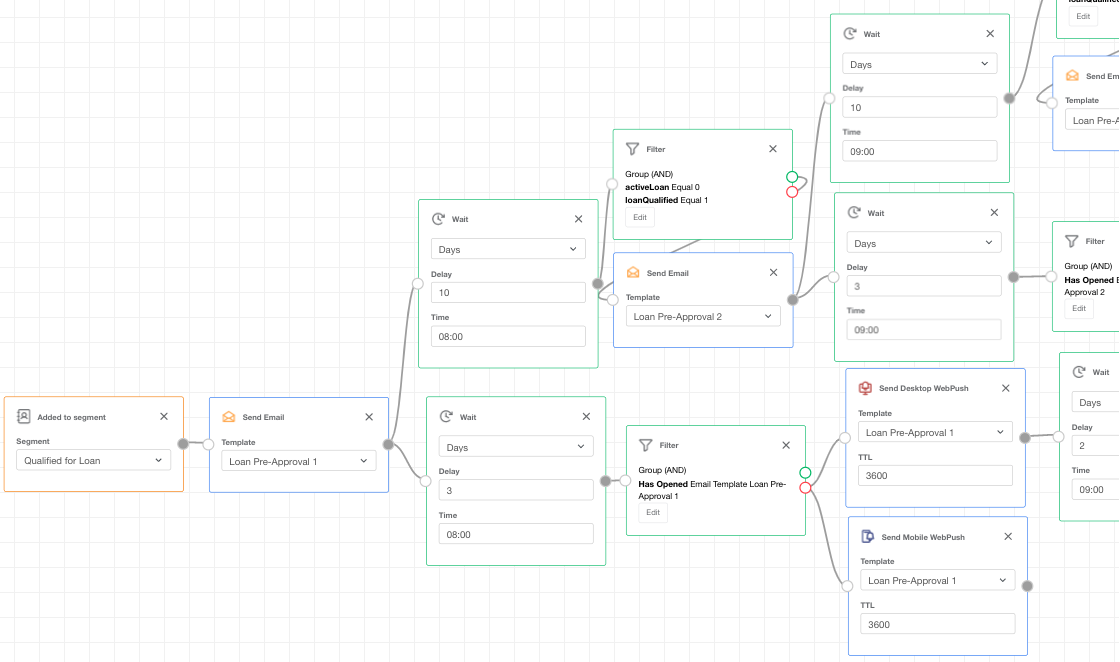
4. Send the first email once the contact is added to the segment.
Wait a few days (up to a week) to give the customer time to open the email.
5. In a couple of days, if the contact is still in the segment, the system checks whether the addressee opened your email, and if not, you can send a desktop/mobile push notification.
Regarding personalization, checking whether the contact interacted with your previous message before pushing them further is recommended. In that case, you won’t overdo it with the same/similar content.
6. You can wait for two/three more days, and if the contact hasn’t applied for the loan yet and didn’t interact with the first email, then send an SMS once again to get in touch with the customer and encourage them to take the desired step/action.
This step is optional, but this is a perfect way to try to draw your customer’s attention through multiple channels. This will help you collect analytical data on your customer’s preferred communication channels.
7. Wait for a week or so, and if the contact is still in the segment, send the second email with additional information regarding mobile banking, introduce some features, offer incentives, or instruct on how to use your mobile app.
You can send as many emails as needed based on your email content plan. Remember to keep the same interval between the campaign emails because SPAM filters pay special attention to randomly sent emails.
Repeat steps 4, 5, and 6 as many times as required.
Suppose the customer takes your desired action, meaning applies to the load. In that case, the contact is automatically dropped off the current segment. It is added to another one with other campaigns based on your marketing strategy (for example, regular newsletter recipient, active traveler, inactive cardholder, etc.)
Email Templates
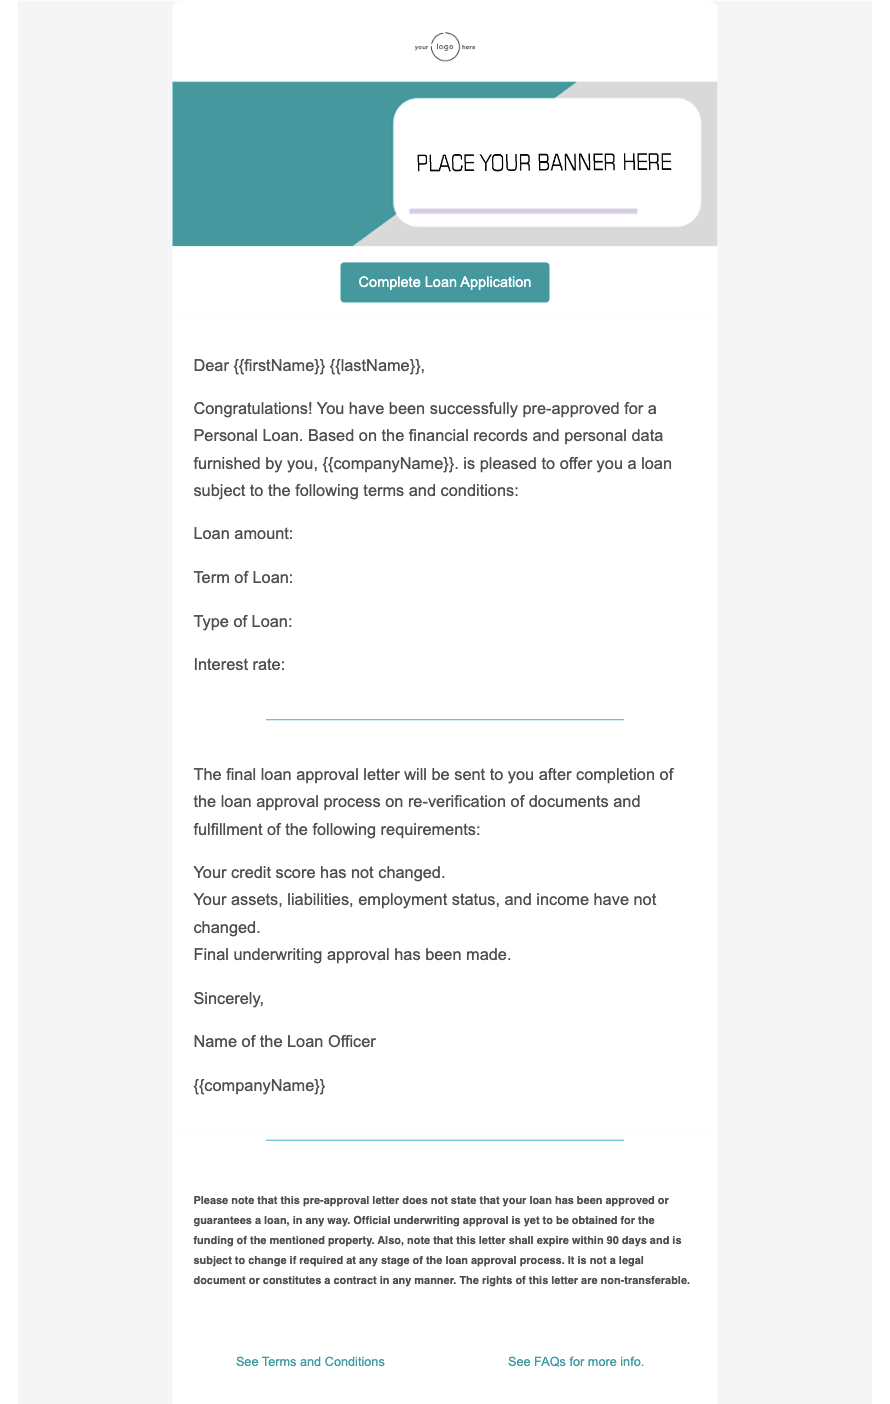
- Mention the borrower’s correct and complete name: It helps avoid any transfer of rights and forging in case of real estate fraud. You can address the applicant using the word “dear.”
- Insert a date in your letter: Pre-approval letter examples specify the format where the date should be mentioned. Typically, these letters are valid for only 90 days. The final approval process must be completed within this period. Hence, inserting a date is essential.
- Explain the loan terms: Mention all the required details, such as the pre-approved loan amount, property address for which it has been pre-approved, interest rate, loan term, and the type of loan program. Some banks also mention the required amount of down payment in the pre-approval letter. Mention these details in the form of bulleted points for clear understanding.
- Include a disclaimer before closing the letter: A disclaimer states that the letter is not legally binding. Moreover, a guarantee of loan approval should be included before signing off the letter. It should also be noted that the final loan approval shall not be obtained unless the specified requirements are fulfilled. The applicants should be aware that the loan application shall either be accepted or rejected after the final underwriting and approval process.


