Shopify Integration
Shopify is a leading e-commerce platform for online stores and retail POS (point-of-sale) systems. The Shopify integration with Wooxy provides merchants with powerful tools to enhance their marketing strategies and customer engagement initiatives. By connecting these platforms, businesses can design and implement highly targeted email campaigns tailored to specific customer segments, recover potential revenue from abandoned shopping carts, and systematically nurture ongoing customer relationships throughout the entire buyer journey—all while accessing comprehensive analytics that seamlessly track campaign performance and provide actionable insights for optimizing customer engagement and conversion rates.
Integrate Shopify with Wooxy to automatically synchronize your customer database by adding new contacts and updating existing ones with their complete purchase history, browsing behavior, and preference data in the Default Contact list. Organize automatic intercourse with your Shopify contacts in a simple way.
For example, after creating an integration with Shopify, an event "shopify_abandoned_checkout" is automatically generated, which triggers when a contact adds something to the cart. Using this event, you can set up communication for such contacts and process them through automated workflows.
Things to know before you start:
- IMPORTANT: By using Wooxy, you agree to Wooxy Terms of Use and acknowledge that you have read our Privacy and Anti-Spam Policies.
- Synchronization with Shopify can be done in two ways: from the marketplace of our Wooxy platform or from the Shopify marketplace.
- Connection syncs your Shopify account only with the Wooxy Default Contact List.
- If you add/delete/update a contact in Shopify, to synchronize the data with Wooxy, you will need to go to the integration page and click the "Update" button.
- If you want all Shopify variables to be added to your Wooxy Default Contact List, you must specify the name of each variable during the “Match Variables” process.
- When adding a new contact from Shopify, the contact must have at least one of the required identifiers (userId | email | phoneNumber).
- Contacts that are synchronized from Shopify and have the {{phoneNumber}} variable value fulfilled will be automatically subscribed to the Viber and SMS channels.
- NOTE: We recommend you to be logged in to your Shopify account before starting the integration process.
- If the integration process is initiated from Shopify, you will be redirected to the account creation form on the Wooxy platform. This may also happen if you were not logged into Wooxy.
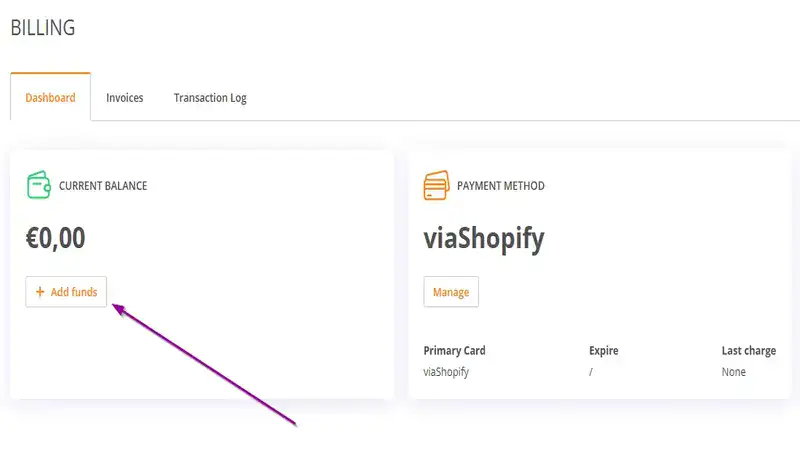
- Billing processes will differ from the standard if you create an integration through Shopify and set up a new account. After completing all the initial setup steps and submitting an account approval request, you will need to manually top up your account balance—this is a Shopify requirement. Wooxy, however, charges payment only after the full account setup and approval. You can read more details in our article - Payments via Shopify.
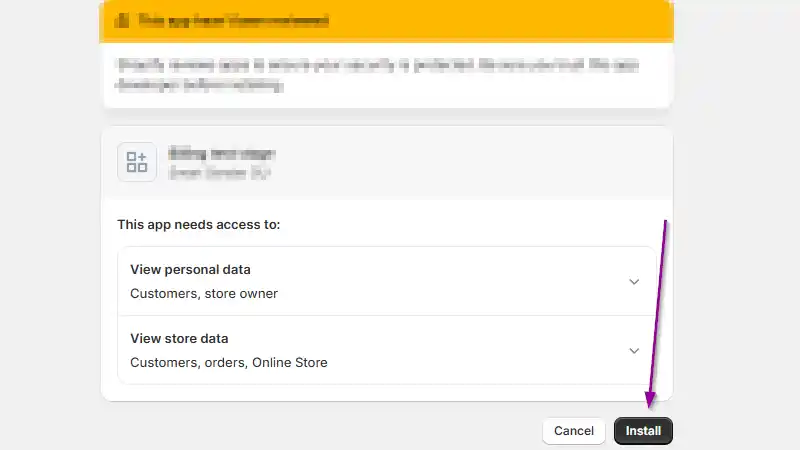
Please note that Wooxy will have the following permissions on behalf of you:
View personal data:
- Customers: name, email address, phone number, physical address, geolocation, IP address, browser and operating system
- Store owner: name, email address, phone number, physical address
View store data:
- View customers: customer data or merge customers
- View orders: All order details for the last 60 days or draft orders
- View your Online Store: Checkout page

Step-by-step instructions:
Navigate to the Integrations page (Menu -> Apps & Add-ons).
Select the “Shopify” section.
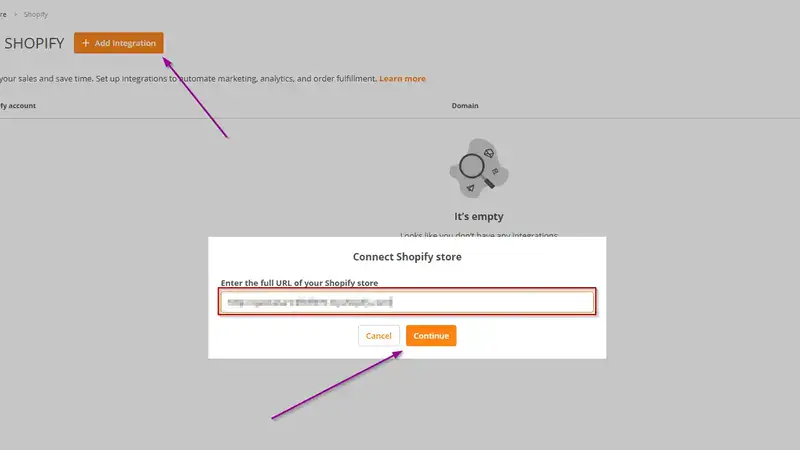
Click on the “Add Integration” button.
In the input field paste the link to your store from the Shopify service.
Read the required permissions carefully and click the “Install” button if you agree to all of them.
Select the Domain from the drop-down menu.
Click the “Continue” button.
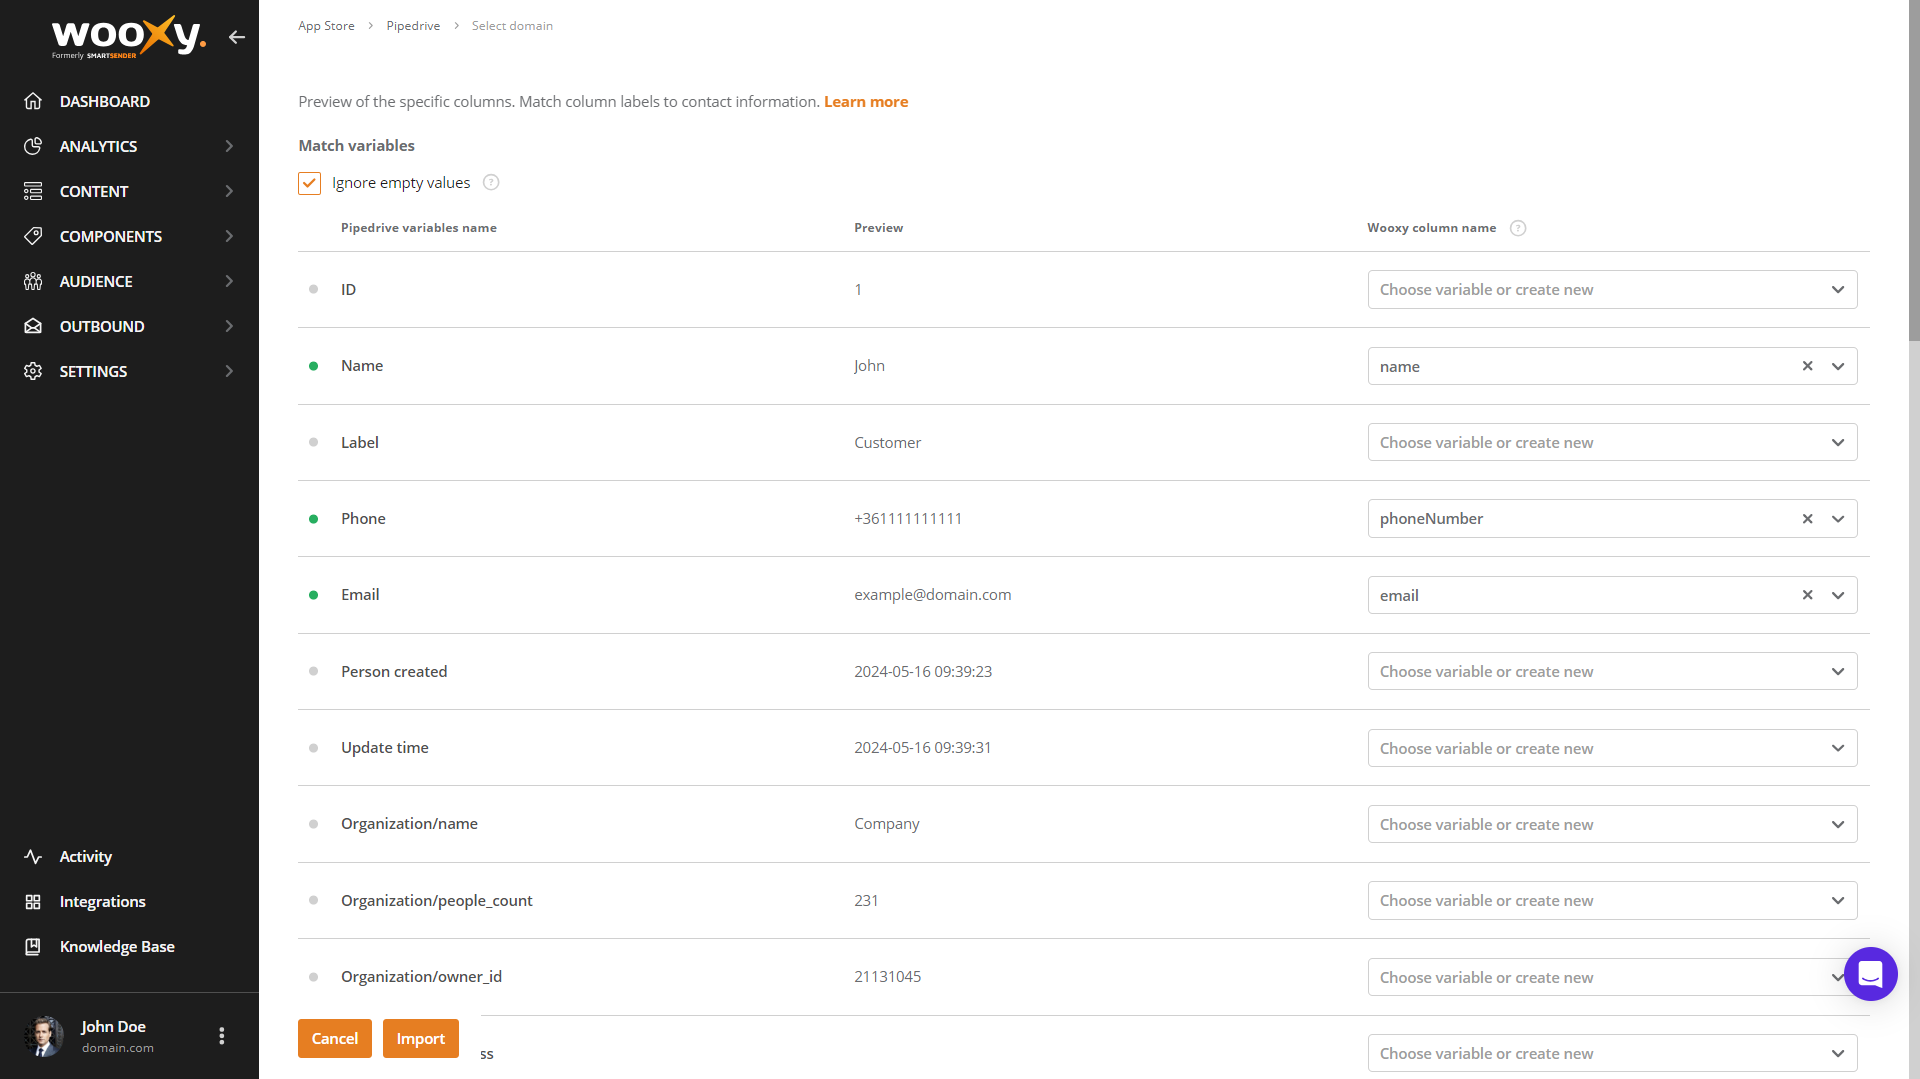
Check all the variables with the “Match variables” feature before adding them to the Wooxy Default Contact List. Learn more about the “Match variables” feature below.
After completing the mapping, click the "Import" button to start the contact addition process.
Synchronization completed.

Matching variable
Match the variables from Shopify with those in your Wooxy Default Contact List.
The process begins by ensuring that the variables in your Shopify system are properly matched with those in your Wooxy Default Contact List. To do this, you can choose a variable name from the list of pre-existing variables that are currently available. Alternatively, if you cannot find a suitable variable, you have the option to create a new one entirely. This way, you can ensure that the communication between the Shopify system and the Wooxy platform is seamless and error-free.
The “Match variables” table columns:
Shopify variable’s name – the name of the variable copied from the Shopify platform.
Preview – the random value of the specific variable.
Wooxy column view – the list of variables already existing in the Wooxy Default Contact List. Here, you can change the name of your variable from the drop-down menu or create a custom new one. IMPORTANT: Custom variables created here are only for the Default Contact List to which you add contacts.

The system identifies the current status of the variable:
A green dot indicates that your variable has been successfully matched with the one that already exists in the Wooxy Default Contact List. If you change the name of your variable by choosing an existing variable from the list after the import is complete, the name of your variable will be replaced with the new one you have chosen. IMPORTANT: Do not specify 2 identical variables during the mapping process.
A gray dot indicates that the variable has not been matched, but this variable from Shopify is in a valid format and has a chance to be manually matched for importing the column from Shopify into the Wooxy system. Select the String or DateTime format, select one of the existing variables, or create a new one. IMPORTANT: Unmatched variables will not be added to the Wooxy Default Contact List.
Mark the checkbox “Ignore empty values” if you want to ignore empty values when importing data from Shopify to Wooxy. In this case, the system will not overwrite existing Wooxy data with empty values.

Press the “Import” button to finish the matching variable process.
NOTE: Some variables in Shopify are considered as two different in Wooxy. For example, the “Date range” field type. It will be divided into two variables: “date range/Start” and “date range/End”.

The same is true for the “Monetary” field type. You will need to match two variables: “monetary” and “monetary/Currency”.

In case the “Multiple options” field type is selected – all the variants will be added as a single variable value separated by commas.

Key aspects to consider for Payment Processing when creating an integration through the Shopify store.
When setting up an integration through Shopify's platform, it's important to understand that you will need to manually add funds to your account balance. This balance will be used to cover various expenses including your subscription plan, any dedicated IP addresses you may require, and additional services you choose to utilize. You can find more details about this in our separate article.
IMPORTANT! Please note that this specific payment procedure is exclusively applicable when you're creating a brand new account at Wooxy through the Shopify integration process. For users who already have an existing account with us, the standard billing procedures will remain unchanged and continue to function as normal.
During the payment method setup process in this scenario, you'll only need to provide certain basic bank card information by excluding entering sensitive payment details such as the complete card number, expiration date, and other confidential information.

Event shopify_abandoned_checkout
shopify_abandoned_checkout is an event automatically created on the Wooxy side. This event is responsible for adding new contacts to the Default Contact list who have added items to the cart from your Shopify store. It triggers approximately every 3-5 minutes and adds all new contacts.
This event can also be used in our workflows to build communication between you and your customers.


