Subscription Forms
With Wooxy, subscription forms make it easy to grow your audience and save contacts to your list. By placing them on your website, visitors can subscribe to receive your important email communications, keeping them informed. These forms are fully customizable to match your brand, helping you keep your contact lists up-to-date and maintain continuous communication throughout the entire customer journey. This makes them a crucial tool for collecting valuable information and enhancing your marketing efforts.
Things to know before you start:
- We recommend giving your Forms easy and clear names to avoid difficulties with finding them later.
The Default Contact List is selected by default when creating Forms. - All forms are created for a specific domain, meaning that each domain has its own forms, and they do not apply across the entire account.
- The order of the fields in the form corresponds to their sequence during the form creation.
- You can input the link to your website where you want to receive the WebHook with the contact creation results.
- We recommend using optional fields such as event and source for further use in automations.
- At least one unique identifier is required (email | phoneNumber). If you include both identifiers in your form, the one specified first when creating the form will be required, while the second one will be optional.
- You cannot select two identical fields when creating a form.
- The contact list for the form can be changed until the first form submission occurs, after which it will no longer be possible to change the list specified in the form settings.
- The standard fields that can be added to the form are limited to the dropdown list. Additionally, you can expand the list with custom variables added to the relevant Contact List.
- Google ReCaptcha V2 is available for use with the form. You need to provide the 'Site Key', which is given after creating the captcha. On the Google side, you need to specify the domain where the captcha will be displayed.
- The default text at the bottom of the Form will be automatically updated with your company's contact information, as specified in the relevant Contact List.
Step-by-step instructions:
Navigate to the Subscription Forms Management page (Menu -> Settings-> Forms).
Press the “Create” button.
There are three steps in the Subscription Form creation
Step 1
Type in the name of the Subscription Form.
Select the Contact List.
Select a Source. Source is an optional choice. In general, we recommend using the Source to filter contacts based on the subscription form they used to sign up. This can help build more comprehensive segments and gather more detailed analytics.
Choose an Event. Event also is an optional field. However, we recommend using this field because, based on the selected Event, you can build various Automations to maintain communication with your new clients who have just registered through the subscription form.
Enter the Webhook URL of the site where you want to receive webhooks with additional information about the contact creation results. This field is optional but can enhance your monitoring of contact status, quantity, and more.
-
Create Form fields
Create Form fields
Name
(required)
The Name field for your subscription form is required. We recommend using clear names to make it easier for you to manage a large number of forms. Contact List
(required)
A required field where you need to select the Сontact List that contacts will be added to after filling out and submitting your subscription form. Source
(optional)
The Source field is optional and helps you build segments and more detailed analytics based on the source you specify for the subscription form. Event
(optional)
The Event field is optional and helps you build automation of any level based on the event specified for a particular registration form. Webhook URL
(optional)
The Webhook URL is an optional field where you should specify the URL of the site to which Webhooks with the results of contact creation will be sent after the registration form is filled out and submitted.
Step 2
Select your company logo to make the form more attractive to potential contacts. By default, no logo will be applied. You can choose an image from the list of images you uploaded earlier in the Files section.
Select the fields that you want to display in the form. One of the two fields (email or phoneNumber) is mandatory. If both fields are used in the form, the first selected field will be mandatory. You cannot select multiple identical fields from the list. Currently, the following fields are available:
- phoneNumber
- firstName
- lastName
- contactBirthday
- custom variables from specified contact list
You can add a CAPTCHA to your forms to protect against spammers, bots, etc. To do this, you need to enter the site key provided by Google after registering the CAPTCHA. Currently, Google reCAPTCHA V2 is available. On the Google side, you will need to add the domain where the CAPTCHA will be displayed.
The final step is to add the text that will appear on the form button, which the contact will click to submit their information. Then click the "Save" button and proceed to the "Publishing" tab.
-
Form Settings
Form Settings
Logo
(optional)
The logo is an optional feature where you can use logos you've already uploaded in the Files section or upload the required logo from your computer directly here. Form Fileds email
(required/optional)
Email is a required field unless you have previously selected phoneNumber as the primary field. Otherwise, the field becomes optional. It is validated according to the standard email format (name@esp.domain). phoneNumber
(required/optional)
PhoneNumber is a required field unless you have previously selected email as the primary field. Otherwise, the field becomes optional. It is validated according to the E.164 phone number formatstandards.firstName
(optional)
The firstName is an optional field that, when entered and submitted through the form, is added as value of the contact variable {{firstName}}. lastName
(optional)
The lastName is an optional field that, when entered and submitted through the form, is added as value of the contact variable {{lastName}}. contactBirthday
(optional)
The contactBirthday is an optional field that, when entered and submitted through the form, is added as value of the contact variable {{contactBirthday}}. It is validated according to the ENUM_DATE (YYYY-MM-DD) format. customVariables
(optional)
customVariables field is any custom variable added to your contact list (see how to create custom variables here). This field is optional, and after being filled and submitted by your subscriber, it is saved as the value {{yourCustomVariable}}. reCAPTCHA key
(optional)
The reCAPTCHA key or Google reCAPTCHA V2 is an optional field. Here you can enter the 'site key' provided by Google. To create site keys, follow the steps and instructions provided on Google's reCAPTCHA setup page. It will be useful for protection against spammers or bots. Confirmation button text
(required)
The confirmation text for the button is a required field. The text you enter here will appear on the submit button of the subscription form.
Step 3
Congratulations, you have fully set up the subscription form, and it is ready to use. You can now proceed to the publishing step.
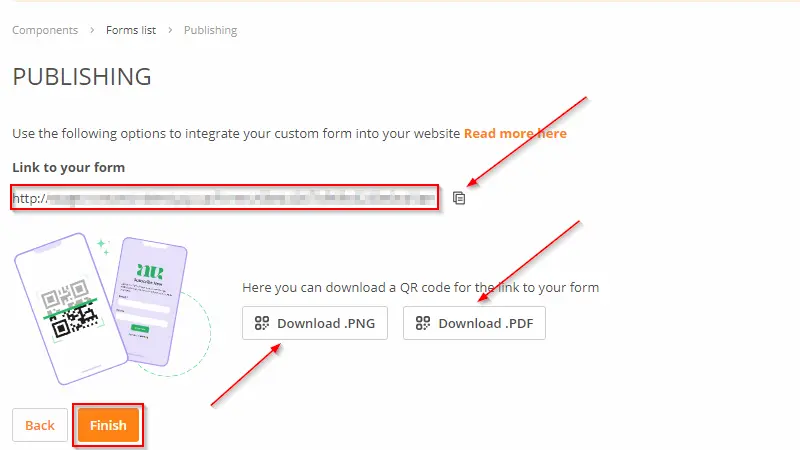
You can copy the link and paste it on your website or any other location to start collecting your first contacts.
Additionally, you can download the QR Code in the format you need, either PNG or PDF, and use it on your website, business cards, or promotional banners.
Once you have copied the link or downloaded the QR Code, click the "Finish" button, and the form will be ready. This may take a little time.
Publishing Example

Manage Subscription Form
You have the flexibility to organize and manage your Subscription Form page according to your specific requirements.
Navigate to the Subscription Forms Management page (Menu -> Settings -> Forms).
Important: Subscription forms are created separately for each domain. For example, if you have a form named Form1 on the domain domain1.example, Form1 will not be available on the domain domain2.example. Each domain will have its own independent forms.
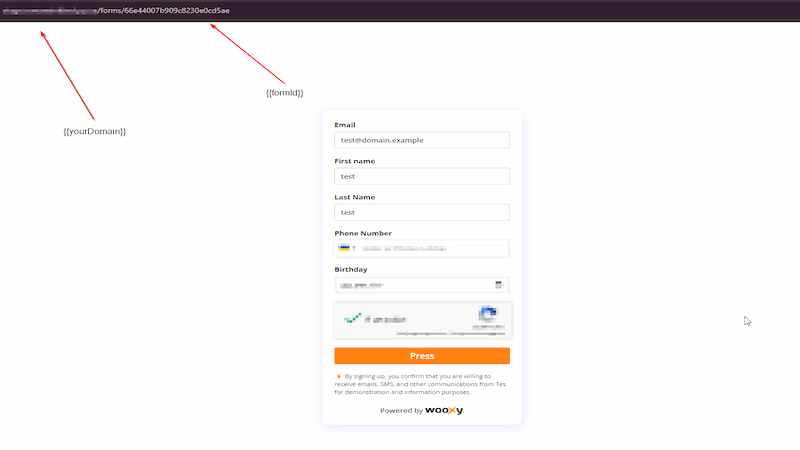
Why is this important? The domain where your registration form is located will be shown in the address bar after a redirect from the link or QR Code.
The link to the subscription form looks like this:
https://{{yourDomain}}/forms/{{formId}}
Where, in turn:
| {{yourDomain} | The domain on which the form was created |
| {{formId}} | The unique identifier of your form |
Form Example

Manage the Subscription Forms List
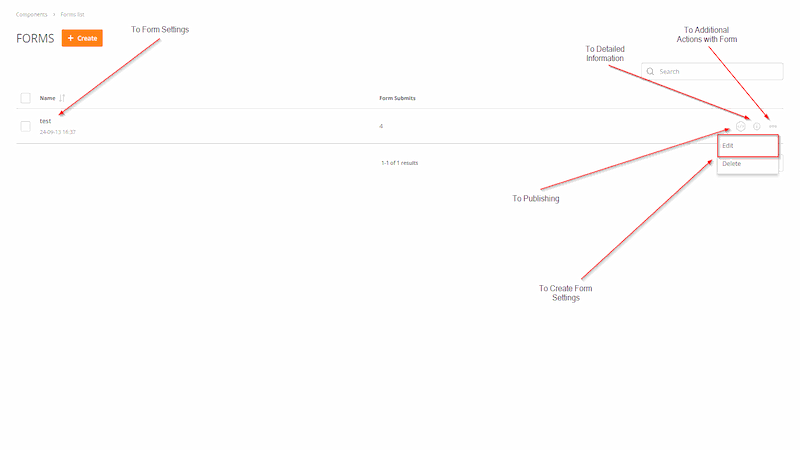
Sort the Subscription Form by name.
Search the Subscription Form by name or by ID.
The “Name” column displays all the Subscription Forms you have.
The “Form Submits” column displays the number of the Subscription Form submissions.
Edit the Subscription Form
You can go back to the "Create Form" or “Form Settings” sections to make changes:
- Click on the "More" and then press the "Edit" button.
- You can also access "Form Settings," by clicking directly on the name of the Form you want to edit.
- To publish your updated form, you need to go to the "Publishing" section, where you can copy the form link or download the QR code.
NOTE: The contact list for the form can be changed until the first form submission occurs, after which it will no longer be possible to change the list specified in the form settings.
Delete the Subscription Form
Another action is available by pressing the “More” button:
- Press the Delete button to remove the Subscription Form without a recovery option.
- The Subscription Form could also be deleted by choosing the selection box next to the Subscription Form row.
- Mark the box above, and you can select and remove all Subscription Forms in your list.
The Subscription Form information
Press the “Info” button to get acquainted with the Subscription Form details:
- The status of the Subscription Form
- The name of the Subscription Form, along with its ID.
- The date of creation of the Subscription Form
- The name of the Contact List you selected, along with its ID.
Management Example


